No Tricks all Treats

By far the best Halloween costumes we have had so far in all 11 years of child raising.

Every year we ask the kids what they would like to be for Halloween, it usually starts with the delivery of the Chasing fireflies Halloween costume edition and from then on at story time we are leafing through the mag hearing about all the options and how we could all go as pirates, or momma you could be this and poppa could be that….or I bet Farley would be a cute yoda.

Now if you get this magazine like me you probably wonder how these prices are legal, I mean don’t get me wrong they are cute as can be and resale (for an eBay lover like me) is totally worth it, but I Like the kids to put more into the costumes than pointing a finger and saying “that one”.

So he is what the final choice was for everyone:

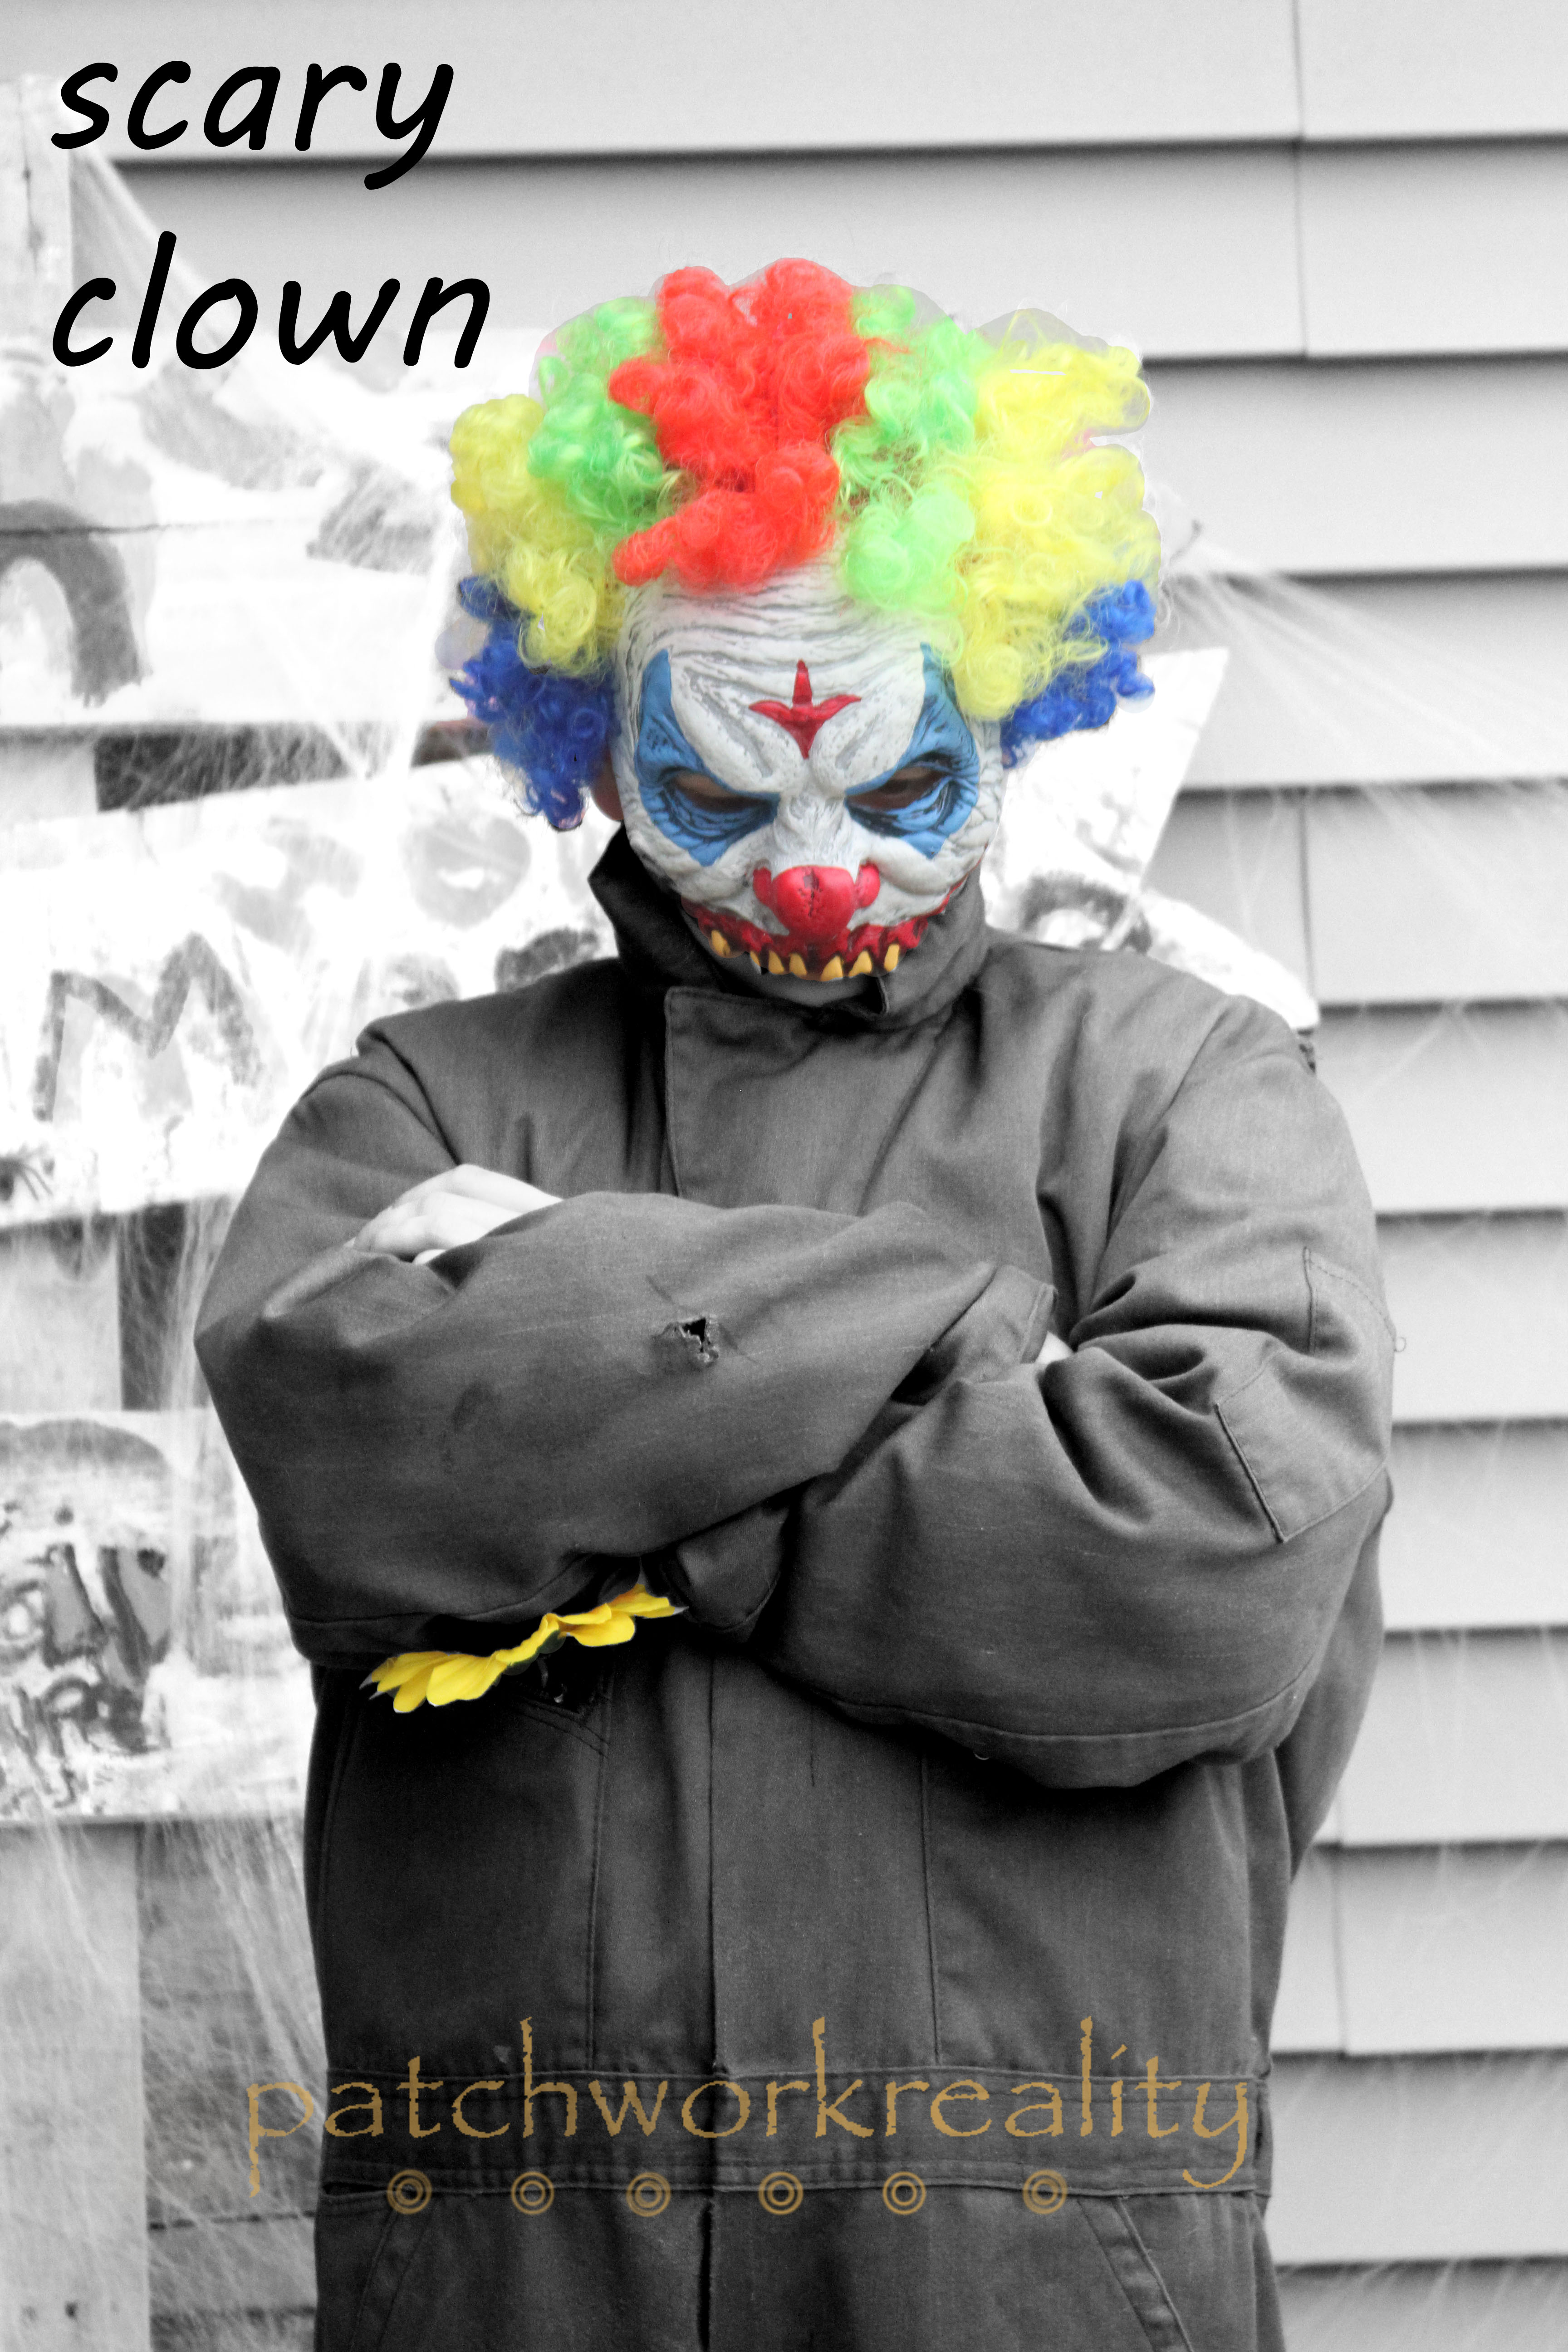
Solomon: scary clown.

Raiven : exterminator (bugs, and such)

Santanna: Viking princess warrior conquerer (not a football Viking)

Avalon: Pocahontas

As we wrap up the Halloween weekend I thought I would share their costume since I was literally still sewing  a few parts on them as the sun was going down and porch lights were turning on Thursday, I will be happy to go tinot maore detail on any of the parts if any one is interested.

Solomon…no real inspiration photo just what /he/we came up with:

scary clown

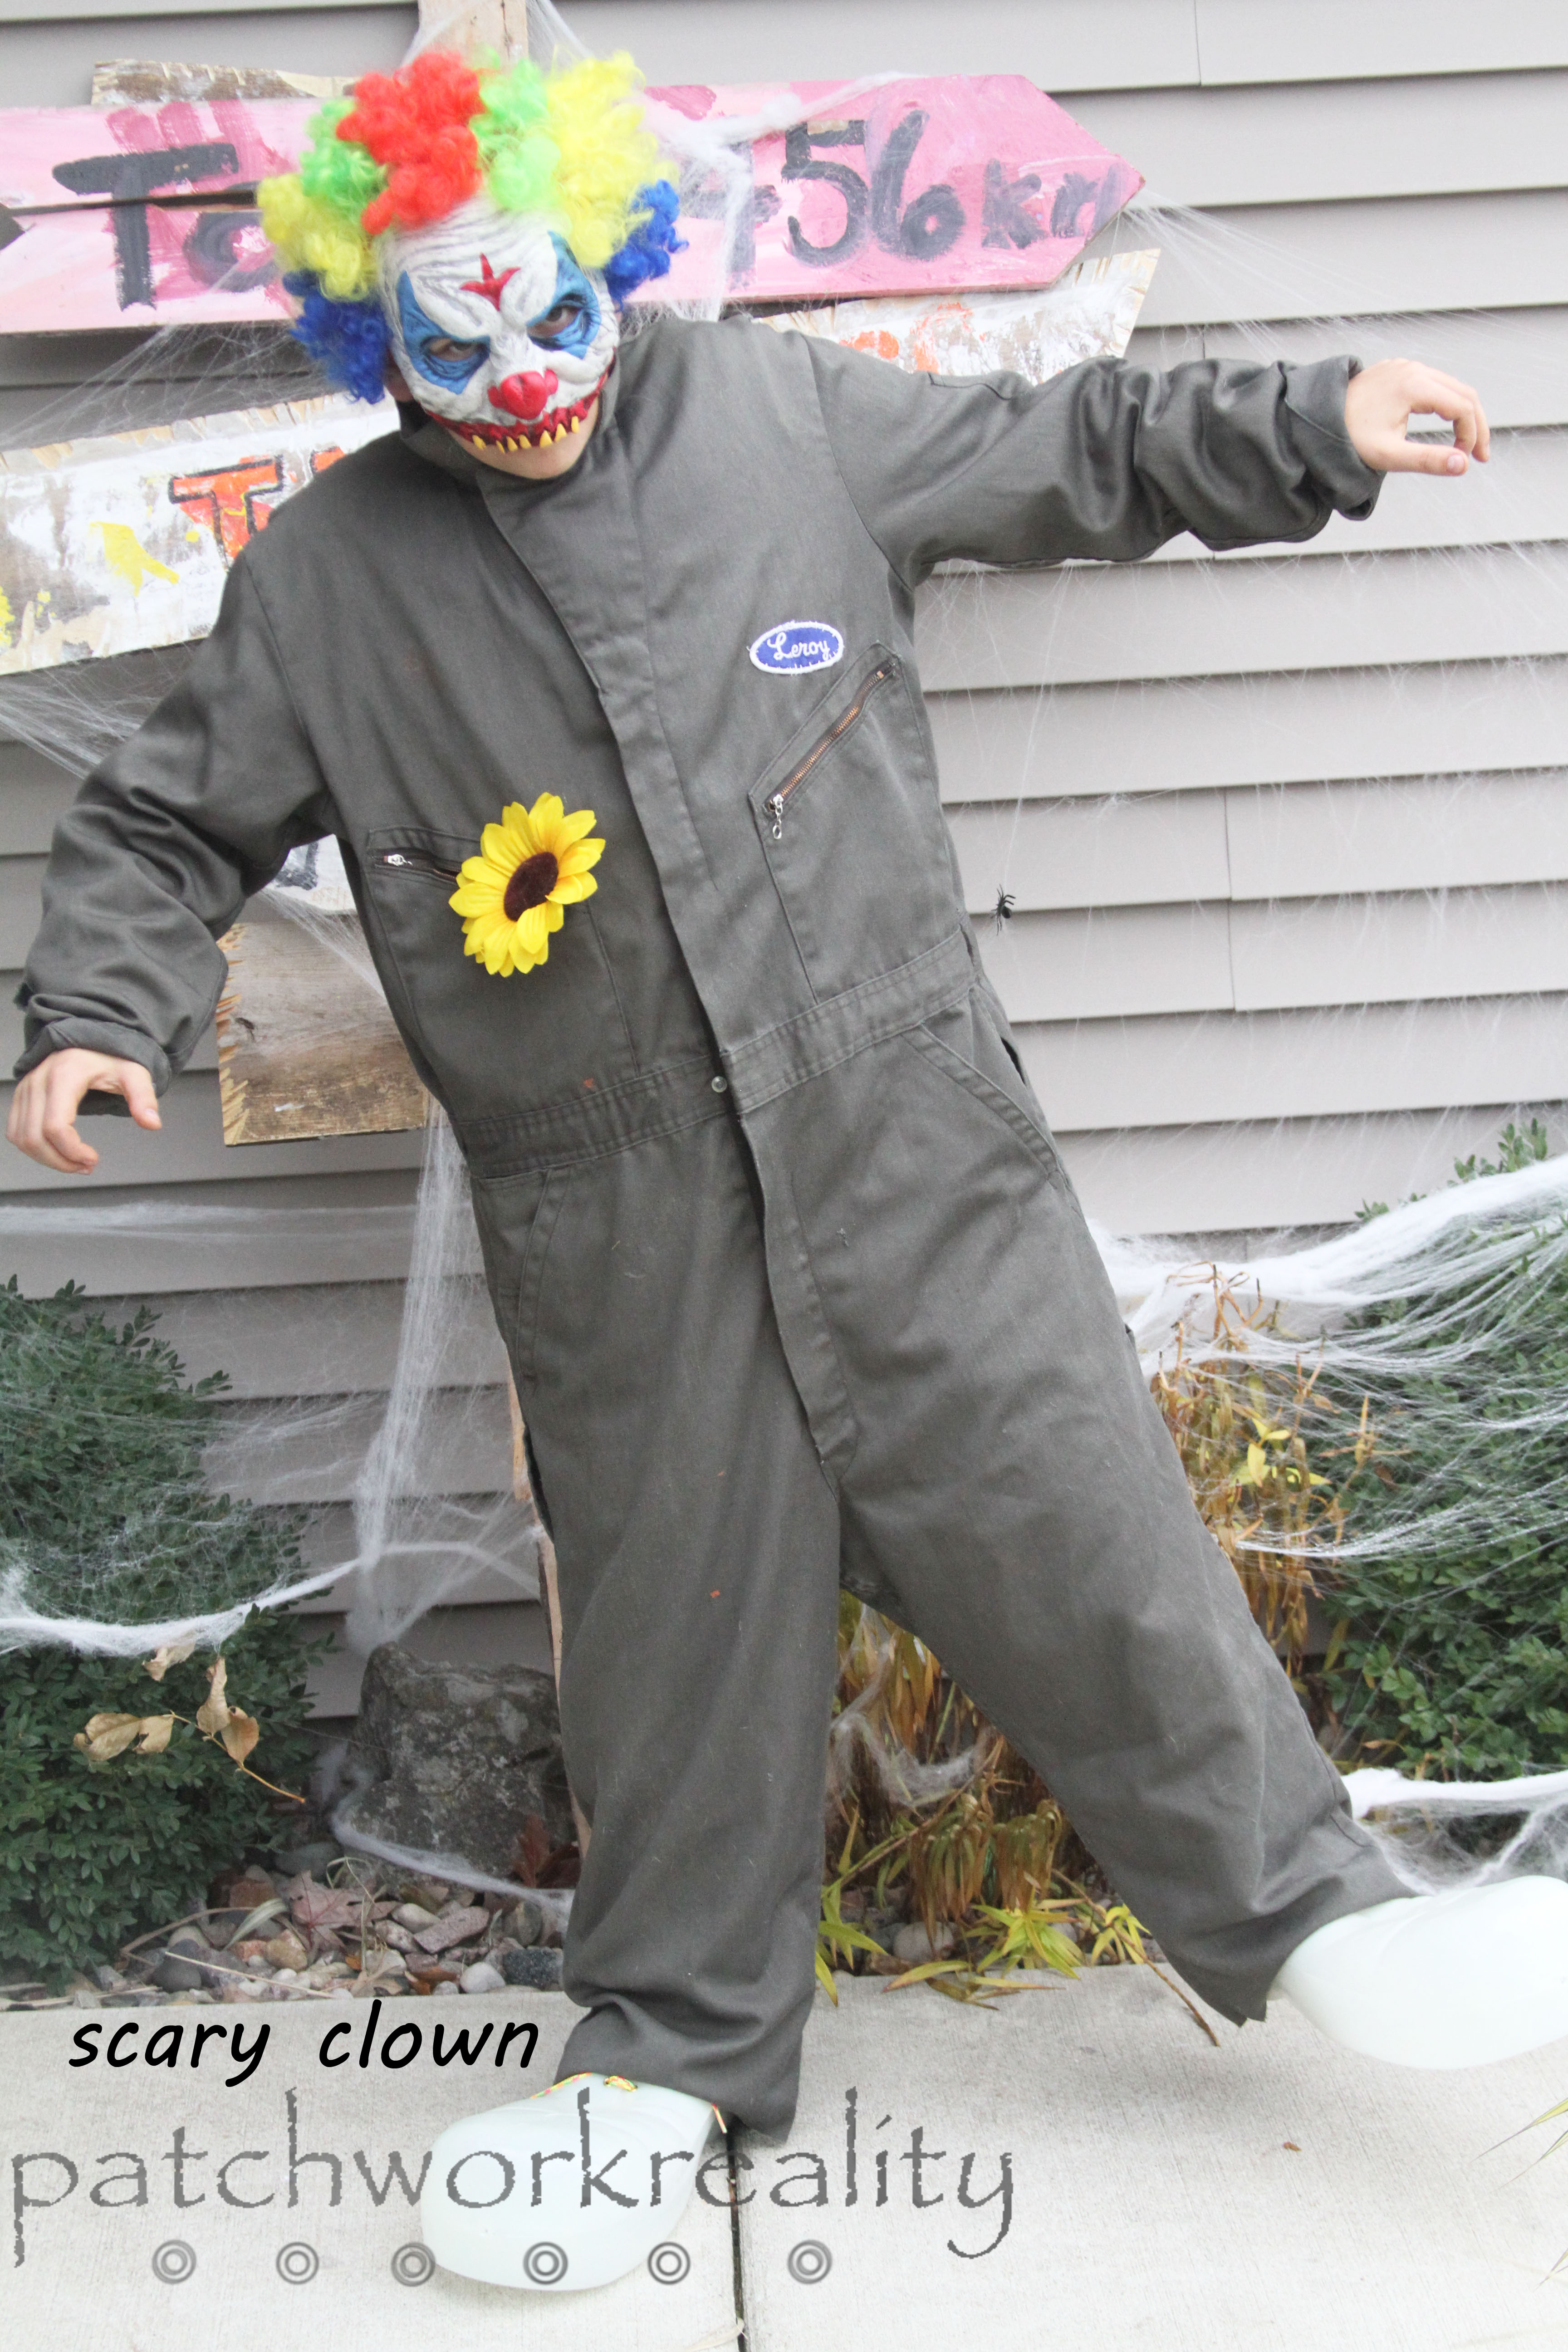
We thrifted the green coveralls from Savers , they are a size 44 Long…..huge on this guy, so we cut the bottoms of the legs off.  I found the Leroy patch in the sewing box I shared a while back, the mask we found at savers as well, shoes are from goodwill and glow in the dark (he did not trick or treat in these) flower that squirts water we found at party city.

scary clown 2

How many 9-year-old girls wanted to be an exterminator this year?  1?….mine?  We looked at the Ghostbusters costume and that was NOT it, so here is our version of an exterminator:

2013 October 891 copy

Hand held “fogger”  I am not sure what it is called but I found it in the garage and it fit in the clear tube that I had attached to her “chemicals” on her back pack.

exterminator 1

The clothes are her brothers that were too small, and we patched the hole with more goodies from this sewing treasure box I found. The boots were also a hand me down.  the hat is just a ball cap with skull duct taped on over the words, we did this on the hoodie as well.

2013 October 883 copy

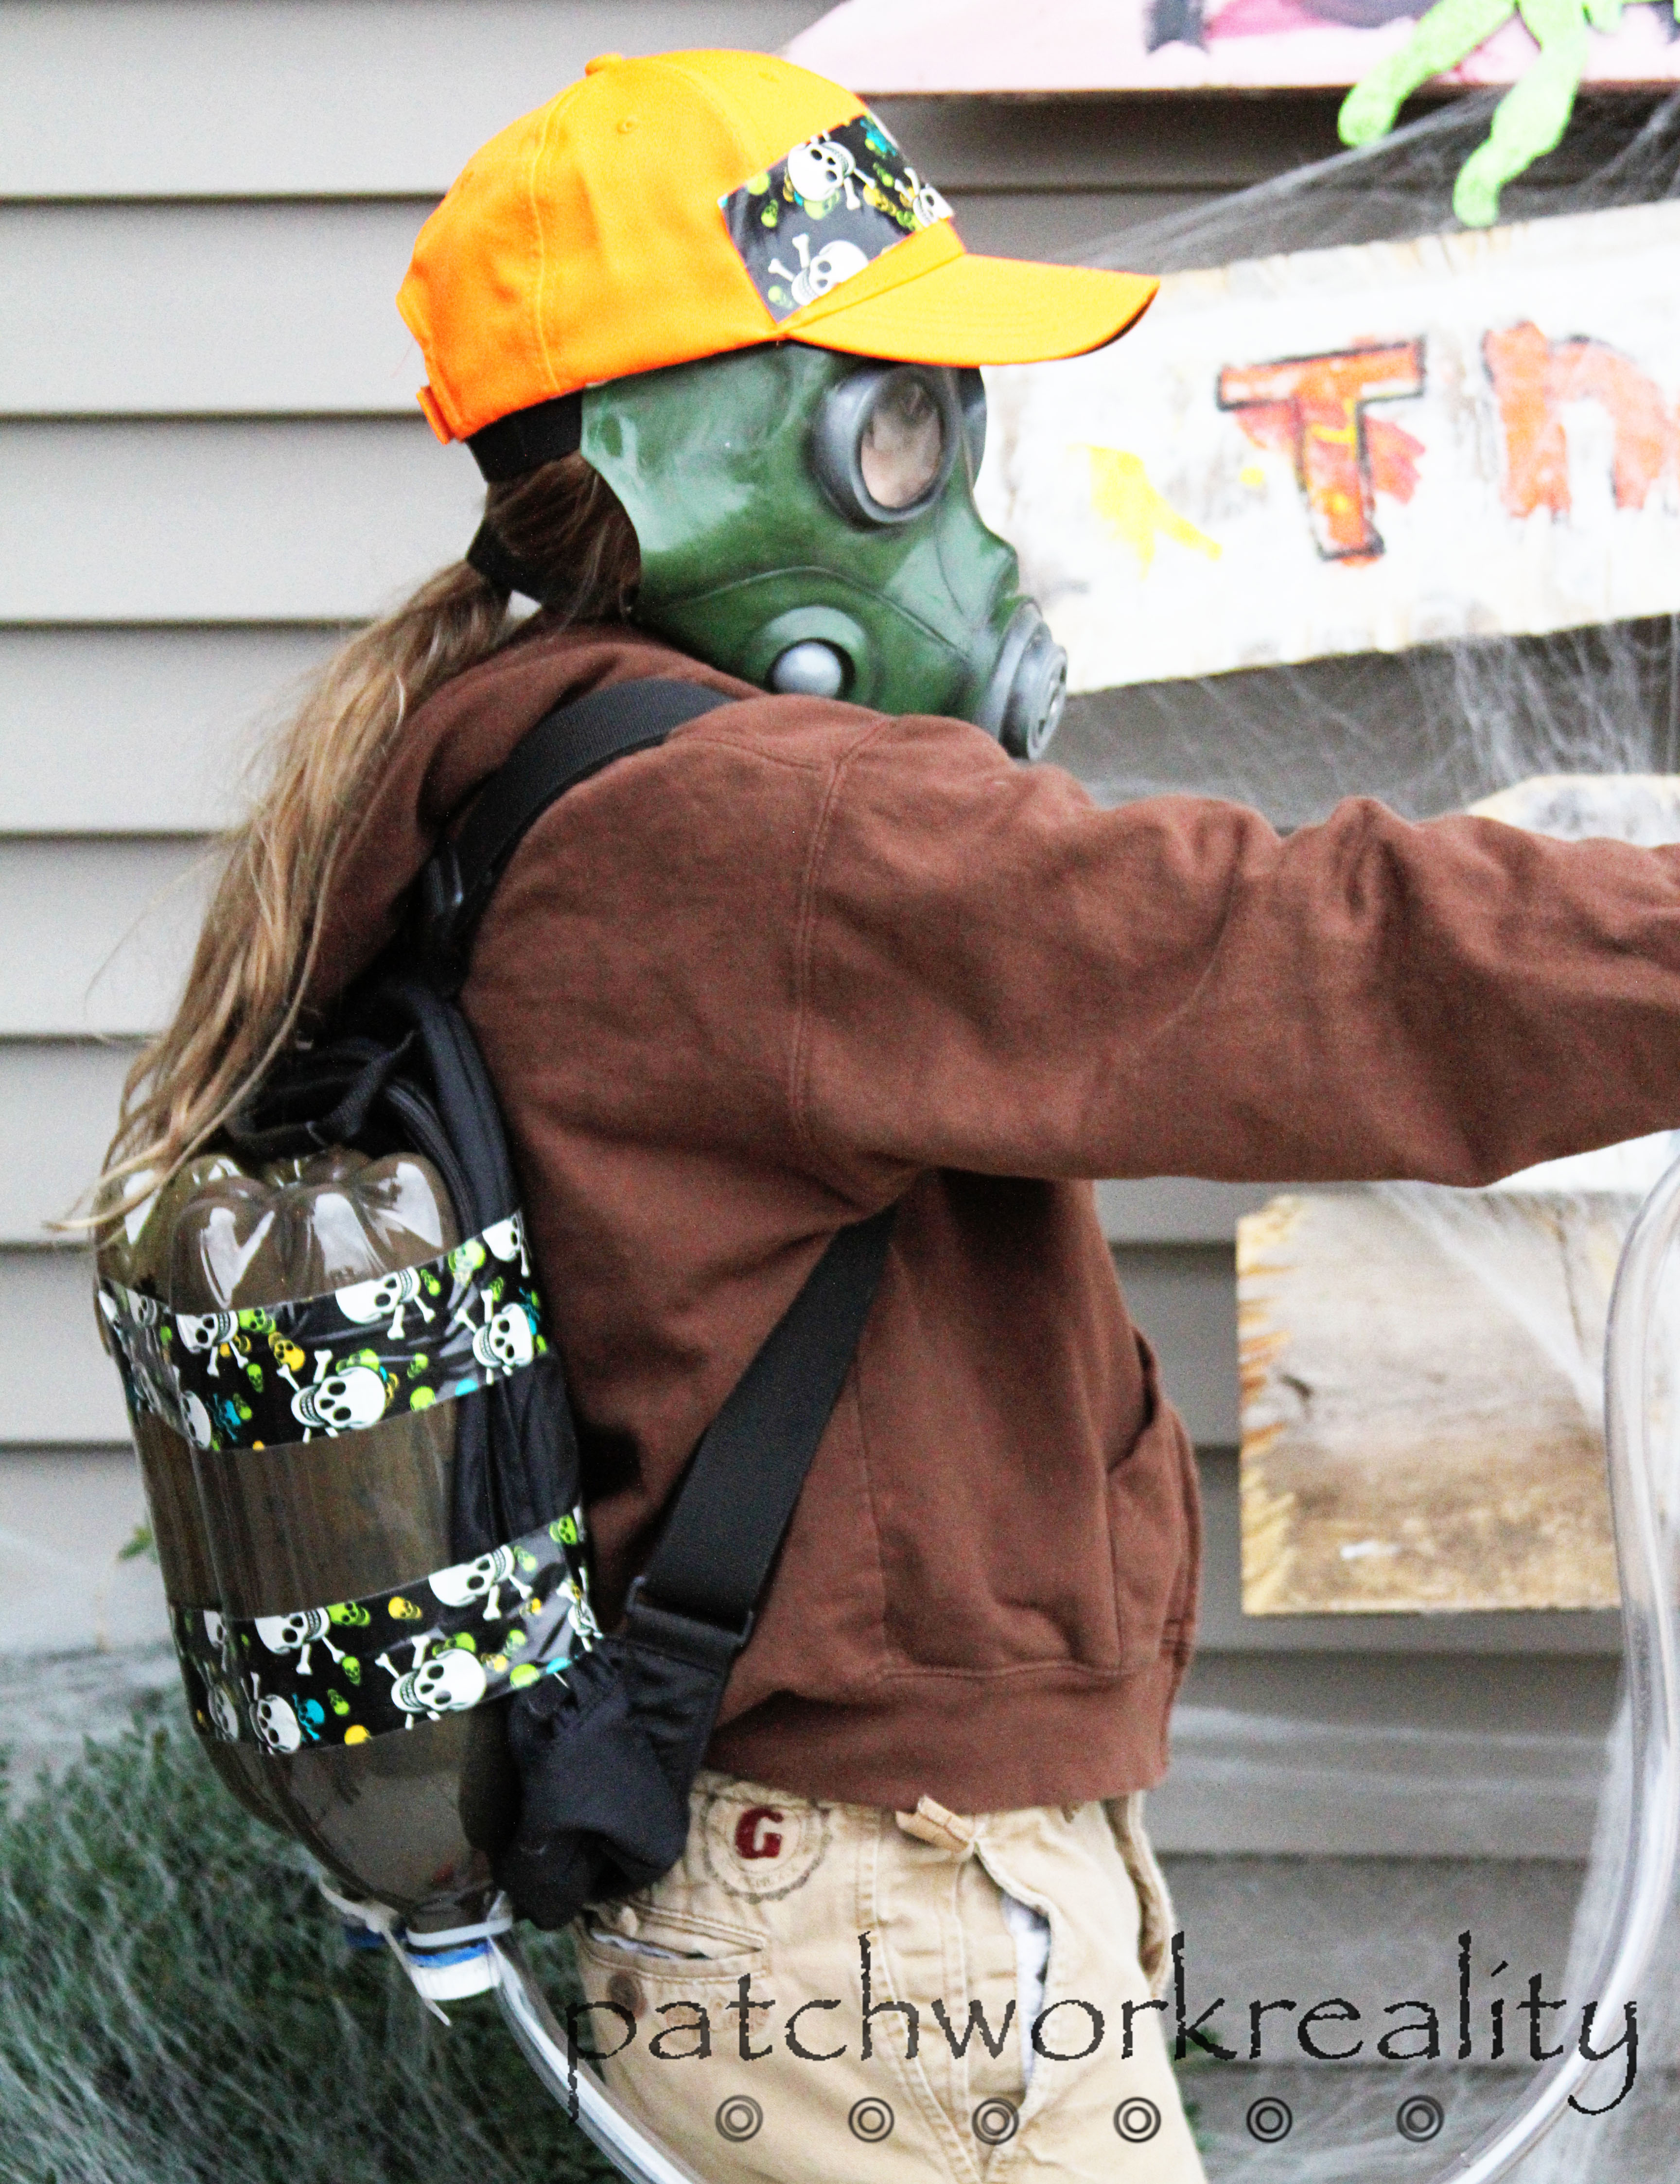
We took 2-2 liter bottles and Raiven mixed and swirled paint in them to make her desired color, then I attached them to a small, purse size backpack with more of that skull duct tape.  We found the mask at a local Halloween shop.

Santanna: this is the costume she wanted:

Halloween 2013 warrior girl costume - Chasing Fireflies

Chasing Fireflies

Here is what we created:

Viking Princess

Santanna LOVED it, and it was really warm.  Head to toe, Viking helmet is from party city, so are the leg cuffs, we cut them off a little since they were meant for adults, so we sued a scrap as hair under the helmet also meant for adults…perfect! she has on a gray tiered dress from The children’s Place that was handed down from big sis, brown leggings, Primigi boots and a long sleeve layer shirt.  The sword was also from party city.  Instead of a shield she had her trick or treat bag in her other hand.  I sewed the cape, and added a hood.

Viking warrior 2

She picked out the fabric and had to have some color so we added this little blue streak in the hood. Jon called her Helga and others commented that she looked like a character from how to train your dragon.

Last but not least, Pocahontas, Avalon is probably her biggest (smallest) fan:

Pocahontas

This is a very warm fleece costume and headpiece from Old navy that was sold about 7 years ago, I have found it on eBay for a few years in a row and bought the 5T this year, once she outgrows this I am not sure what we will do, Disney does not make a winter version of Pocahontas dress up, which is a must in MN. Boots are Minnetonka triple fringe boots, we had tights and the bow (with missing arrow) was from a local Halloween store.  The belt was a fifty cent thrift years ago.

Those are the spookables I went trick or treating with this year. You can pin these as ideas for next year

Upcycled Jewelery Oraganization

Is it May already…and almost 1/3 over. I am still pushing foward on the NYR to become more oranginzed.

Organization in our house is a constant battle, a good one, but hard-fought non the less.

With 3 girls, the princess accessories are at an all time high, but I am sure it is just the tip of the iceberg.

At her recent campout birthday party, Raiven received a few new special accessories, she has pierced easr, has been acquiring necklaces and bracelets from relatives and friends, and thrifting. Until this project she was hanging them on a wooden drawing doll, is that what it is called?

I accidentally deleted a whole card full of photos…ugh! So the before shots are none existent..but here is what we did:

I had 2 black picture frames that were thrifted or the glass has brokern out of, I was tired of tripping over them but knew I would find a use from them….eventually.

When I saw this I decided to upcycle the old frames to organize our oldest daughters jewelry.

We spray painted them in Raiven’s color choice.

Then Hubby cut, he is the type A to my relaxed type B, and attached chicken wire to the frame.

He attached them to the wall with hallow all sinkers, since they were not on a stud, we wanted them securely in place.

2013 May 058 copy

WE added these hooks to the chicken wire, we crimped the top set closed so they are fixed in place, but we left the others uncrimped so she can move them around as she likes.  These are from Menards, but I am sure any hardware store has them.

2013 May 059

The other side we did not put any hook on, we left this one for earrings so she can just loop them over the wire.

2013 May 055 copy

I made the yellow beautiful art on her wall, inspired by one I saw on Zulily.

She is thrilled with this new addition to her room, and is really lets her showcase all the special jewelery she has, as most of it has been gifts.  It also gives her the independence to choose what she wants to wear and gives her the ability to easily care for her special jewelry.

2013 May 050 copy

Appliqued Turkey Shirt Tutorial

Happy to update from yesterday’s post that the Turkey shirt has made it through BOTH the washed and the dryer!!

Here is what I now have for Santanna:


I am very happy with the way it turned out, I really like the raw edges on all of the appliqué, it gives it a bit of a feathery feel…if you make a shirt like this you can use a product called fray check on the edges and it should prevent this from happening, it may make the edges a little more stiff though so keep that in mind.

Please keep in mind that I am in no way experienced in the art OR science of sewing, especially with a machine, that being said here is how I made this shirt:

1. Grab a shirt, this black one was for sale in my ebay store, it was a new with tags Target cast off that set me allllll the way back 49 cents….so really if you are a novice like me, just take a shirt that you already have or thrift one, just in case…..

2. Gather fabric, I recommend getting material that is not very stretchy, it will make this much easier when sewing onto the T shirt that is stretchy itself, I am pretty sure the fabric I used was quilting fabrics that someone had donated. If you have old sheets, tablecloths etc, these would be great

3. Grab templates for a circle, and feathers, our local bread store gave the kids these “feathers” to color and return for a free cookie, and the circle is a trace around any round object that you have at home. I know some of my directions might not seem super concrete but I think that any artsy/craft project should be more of how you like it with guidelines than solid have- to’s..

4. Cut out all your templates, I free handed the eyes, the fabric I used dictated the eyes, you might want circles or layers, play around with what you have until you like them the I had a few different styles before I decided I has them right. For the beak I cut a triangle and for the snood (the bacon looking thing, yes I had to Google that) I cut a free hand bacon shape. I cut different size circles for the body which was dictated by the size of the shirt. So you have a circle (body), arrow shapes (feathers), triangle, (beak), and a bacon shape (snood).

5. Now lay out your feathers on your shirt, move them until you like how they lay, I did some at different lengths to give it a natural abstractness, then lay your circle over them and carefully pink the feathers to the circle but NOT to the shirt. Sew around the circle to set feathers in place, do not forget to backstitch. Continue these steps, continuing with the beak, eyes and snood (are you comfortable with this word yet?…not sure I am :))


6. Now you should essentially have a turkey patch or an appliqué, lay it out on your shirt, and pin it into place, after I did this I found there were some feathers that needed a little trimming here and there. Now here comes the trickiest part, sew around and up and down your circle and feathers to completely secure your turkey into place. Here is what I learned: the first shirt I made I actually just went whole hog and stitched the turkey parts onto the shirt like above, but I found it got very bulky and was hard to keep all the feathers straight. I did complete my first shirt by sewing right onto it so if you feel like this will work for you please do not let me discourage you. I just think it works better especially for the eyes and smaller parts to already have them sewn on prior to sewing on the shirt, otherwise it gets to be quite thick, and this starts in the T word….tension, I am not there yet. I appliquéd my turkey one feather at a time, and then laid my shirt back out to make sure all the parts were where I wanted them. I did end with some puckering some pieces moved a bit, but I really like the originality of the way it looks.


7. Decide if you want legs, or any other special details, a little fabric bow would be cute if you want a girly turkey. Snip any loose threads, turn the shirt inside out and wash in cold in and dry as you would any cotton T shirt. ENJOY your Turkey shirt!!!

The kids are really having fun with this, I just finished Solomon’s shirt tonight and he decided his needed legs, Raiven has decided that she would like hers appliquéd on with dark aqua thread. What better way for us to all hang out and be creative, then THEY get to wear it!!

You can see it is not perfect, but I can tell you that I have less than $6.00 invested in each shirt, if even that. I will post a picture of all of us at the Turkey trot.

Thanks for looking!

Gobble gobble:)


Repurposed Puzzle Snail Mail Letters

It seems to me like all we ever get in the mail are bills, magazines, political propaganda (which I think is over now, thank goodness), and an occasional party invite.

In my sometimes old fashioned nostalgia I encourage our kids to send letters to friends or family.  Santanna is especially fond of making letters and pictures for her little friends.  Who does not like to receive a fun piece of mail personally addressed to them in ink??

Our friends daughter,  who I wrote about previously  who is battling brain cancer, is getting an overwhelming amount of mail, letters and packages, guess who feels a little left out/angry about not getting any mail?  Little sister Elsa.  So, her mom grudgingly asked if we could help a girl out and send some snail mail Elsa’s way.  I think we all know how hard it can be to actually ask for help when you need it right?!

This got me thinking, we needed to blow up this girls snail mail box, how many pictures was Tanna willing to color?

Then it came to me, a puzzle letter:

Here is what we did:

  1.  Went to savers (you might have one of these not being used at home as well, we recycled this one, you might be able to repurpose your own),  bought this puzzle.

2.  We put the puzzle together upside down. This is harder then you think wihtout picture clues.

3. I helped Santanna write a letter and she drew whatever and decotared whatever she wanted in Sharpie and Crayola markers.

       4.     I included instructions with the first envelope.

       5. Then we took the puzzle about, mixed it all up and I got out my postal scale for mailing packages and we weighed each one equal to/less than an ounce.  For this puzzle it was about 5 pieces per envelope.

                                                                                                                                                                                                                                                                                                                                                                                 I am so excited for her friend to get this, she is going to be thrilled, plus it gives her something to look forward too.

I think I am also going to do this when the big kids are at camp for the summer.

Candle holder repurpose…candy jars

I combined two pinterest inspirations into this latest project.  Please note I am not a perfectionist, there will more than likely be no magazine shoot for my projects, I just get excited when I see other people’s great ideas and have to do it myself, DIM, or at least give it my best shot.

Here are the two inspires…color and idea…in that order:


The wonderful yellow frame photoraph above I saw on pintrest and belongs to Kara May photography

The apothecary jars in that amazing green color I also found on pinterest and are the handiwork of Kayleen from This old Chair.

Yellow candle holders painted in a vibrant yellow and repurposed as candy holders, I held off on using a vessel with a top because in this house that would just not work, little hands need to be able to just reach in, I would probably find the lids under the couch.

I am so happy with the color and how they look, I am going to leave them out until after Thanksgiving and restock with fall candies.

I was so happy when I found all the pieces that I needed to make these all at SAvers, I spent a total of $16 dollars and some change on these, not including candy.

I laid these out, cleaned the stickers off them and laid a tarp underneath the metal stand, and painted them on a vitually wind free day.

White plastic globe birdfeeder upcycle

I am having trouble fitting all the pinterest ideas that inspire me into the short 24 hours per day, unless I go without sleep some will just probably never get done.

However, there was this amazing chicken house that was pinned, which led me to Karens’s blog: The Art of Doing Stuff , where I saw these:

From The Art of Doing Stuff

I knew this was a doable project and the next time I was at Savers I scored one of these orbs.

The orbs in the picture above are glass, and on her blog Karen shows what can happen if one slips out of your hands while crafting one of these, I lucked out and got a plastic one.  With 4 young ones around the house I knew a glass orb did not stand a chance.

So you will need, a plastic orb and some sort of strong string, we used twine:

You can see this is not going to be a  spendy feeder so if some hoodlum decides to snag your bird feeder some night, it won’t be a huge loss, except for the birds:

Take your plastic orb and drill 2 holes across from each other on the top third of the orb:

Next take your string, twine, rope or what you are using and string it through the two holes you just drilled, you can ties these in a knot and hang it from your tree.

Tie the string in your preferred knot and hand from a tree limb….also pretty important to fill with birdseed, which you can see we need to put on the list.

Total cost: $1.99 since we had the twin already, who know how much the bird seed will cost, but you can factor that in.

Total time, about 5 minutes.

Renewed floral chairs.

The narrow farmhouse table I made here via some slight modifications from Anna White’s amazing website was in desperate need of some chairs.  Luckily I had a set of chairs that I has snagged from an estate sale for $10…for teh pair, I thought this was such a great price.  then I got them home and they just did not fit anywhere.   I have had them for sale at 2 maybe three garage sales and even moved them from one house to another.

Perservenece….or maybe just an inability to let a good thing go for fear of wanting it again someday has won this battle, I recovered these chairs with some cushion and fabric from Hobby Lobby and am totally in love!!

I am sad that I can’t find a before picture to increase the wow factor, I am sure I will find one in the archives at some point, anyway here are the chairs:

There’s a new Godfrogger in our yard…


Found this little frog chilling on the shelf at Saver’s and picked him up for $2.99 is he not the most chill frog you have ever seen? Plus there are daisies around him, I suppose you could argue they are water lilies but daisies are my favorite, so I am sticking with daisies.

Anyway I envisioned him as a metallic green color, lurking somewhere around our yard. Here is his new coat, I love the color, I think I want him to blend a bit more.  So now I am not sure this color is a keeper. Should he get a new coat?
What color would you paint him?


Almost done..Corner Fireplace

What took the longest on this fireplace project was not the work, but the decision making. We cruised along through the framing and even the stone was an easy choice.  We freecycled the mantle our of a tree that had fallen  at the end of the street, we really llove the natural look of it, but are not sure if we want to leave it “raw, or add some color?

Hubby wanted to have a hearth, I think he is envisioning that cheery Christmas card photo in front of this beauty. This is where we hit a major stall. Since we added this hearth we cannot figure out what to put there, stone won’t work, we can’t find a tile, granite or marble that we like with the stone and wood, plus I don’t think we want to add any more types of material to this project.

We decided on the tile in the picture…it is a bit dark but we think it works best :


We really love the way it is turning out we jsut have to finish the hearth and do something with the matle…stay tuned!

Farmhouse Table….New Kids Desk

one thing I love about all the wonderful people blogging out there is that there is no shortage of amazing inspiration and the generosity of the same people sharing the how-to’s for said inspirations.  Once again I fell victim to a must create over at Anna White’s Site.  This narrow farmhouse table here, sent me into the garage once again to recreate the table.  I even had a place for it!!  Under the windows in the office, a perfect place for the kids to do homework and e near Jon and I when we are working in the office.

We made the legs out of reclaimed pallet wood, the top we bought the top and side boards.  I sanded the crap out of the top to make it look as much like a solid piece as possible.

I stained the top and put 3 clear coats over the stain.

I painted the legs white, then I distressed the paint with a hand sander.

I did a top coat of Trewax mahogany wood wax.


Markers, colored pencils, a small light, plain paper, lilacs and lillies out the window, bring your imagination to this table and put it on the paper kids:

I do have chairs for the table that are in teh process of being reinvented…I will add a post about them when they are home….but here are a few more shots of the table: