Teacher gift workshop.

I saw this block calendar project on another site and was smitten , that’s a great winter time word isn’t it. My mind instantly thought “we can do that”.
So we set to work, I  even asked the amazing man at Home Depot to cut a 4 x 4 post into squares for me…. There are about 30 in a post. THANK YOU!!

20131219-212906.jpg
I have tons of paper scrapbook supplies from when I had time to encapsule photographic memories and notations on expensive paper to archive into even more expensive “books”, and a jar of modge podge. So we set to work:

20131219-213259.jpg
Finished late on the last night before the last day of school for 2013. I hope her teacher likes it. Because we do.

20131219-213438.jpg

These photos are from my phone and may not be the best, but I am thinking we will make this project again very soon and I will post a tutorial with some better photos and instructions.  The kids really liked making this.


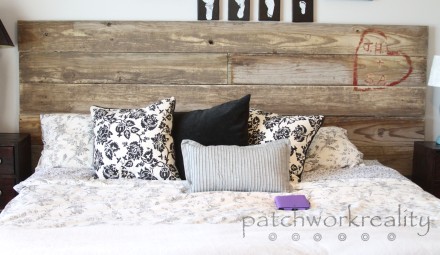
Upcycled Rustic Initial Carved Headboard

When we redid some of our garden space we had some leftover 1 X 8 boards.

Santanna’s bed does not have a frame and these boards have been sitting under the deck for almost 2 years, giving them a great distressed patina.

As Jon and I were talking about how to cut up…or not…the boards and how we attend to arrange them to go over her full size bed I fell more in love with the look.

I decided instead, they would go in our room…over our king sized bed.

We had taken off an outdated headboard and have also been discussing how to upcycle that one.

Headboards are apparently a big deal at our house..who knew.

I wanted to headboard to go past the bed a little so that when the bed is made the headboard would extend at least the length of the bed + bedding, the headboard is a total of 96 inches and goes about 6 inches past the bed/bedding.

Headboard

The back of this headboard has 3 1 X 4 boards placed so the end 2 can attach to the metal be frame and one in the middle for support, you could use 2 X 4 or even 4 X 4 board for the “legs” if you want to change the look, I wanted a sleek profile, plus we had all the boars for this in the garage making it FREE.

2013 June 836

When I was dreaming up Santanna’s headboard I had some thoughts about drawing some sort of graphic on it, she still might get a headboard so I won’t spill those thoughts yet.

I thought a saying that might fit, but honestly there was not one that I LOVED, so I thought how about a carving?

Aha!  Initials in a tree….Awwww..right?!?

SO I used our generic Dremel tool, which I think I killed while doing this and carve d our initials, First name and Middle initial, per Hubby’s request.

2013 June 835

It looks rustic which is great, this was not as easy as I thought it would be, hence some minor imperfections, but I do love the way it turned out.

I did not carve the heart; I painted and sanded all of the heart and initials to give it an aged look.

2013 June 838

On the other side I added the year we were married in paint, I did many different layers and wanted that too look aged as well, I am not sure that it is exactly how I pictured it in my mind, but I can’t say how often my vision and the end product correspond.

Plus it is more discreet then the carving.

2013 June 834

I have to say we are loving this, and that is was FREE from some repurposed garden boards makes it feel special.


DIY Oak Hardwoord Floors.

I shared the pretty; now the nitty gritty.

Here is how is went down…almost literaly.

We let our wood acclimate to the house for a little more than 2 weeks, more than recommended but with all our crazy weather and rain we wanted to make sure it was not too humind, which can lead to gaps in flooring later.

We tore out the carpet.  And by we , I mean Jon, Solomon and Avalon had it up when I brought the other 2 kiddos home from an activity one evening, I came home to them pulling up the tack strips, that held the carpet down, they rolled up the carpet and then rolled up the pad, the bottoms of both had some staining from juice and other spills, reaffirming our choice to go wood.

Carpet Tearout

This is the sandy stuff that was right at the seam of where the carpet had met our existing hardwood floors, I am thinking it is  a combination of,  well dirt and sand 😉  and the backing of the carpet that just sort of falls apart over time. Ick!

Carpet dust?

We cleaned the sub floor which was in excellent shape, it is only 7 years old, by vacuuming and a small warm water/soap spot clean where needed.

Then we laid down tar paper, as a sound and protection barrier between the sub floor and the oak.

Tar paper

Since we were installing this up to existing hardwood flooring we knew it was going to be fairly level but we double checked to make sure that the new pieces going in were level.  We also had to face nail in the first boards since there was a small trim piece that we had taken out and the tongue part of the connecting board was not there.  Face nailing means to nail it into place through the top of the board, we did this with small finish or trim nails and then filled the small holes with putty.

Then we set to work staggering our boards to make sure no board ended at the same spot, and nailed them in place.

After about 4 or 5 rows we would cover it with a red builders paper or rosin paper, to protect the unfinished wood.

When we got towards the end of the rows Jon would cut the last piece to fit exactly in place, this is where some real skills come into place, there will be a piece of oak corner round along the wall trim, but you need to make the end floor pieces fit as close to the space as possible.

Below you can see how we staggered the boards and covered them and toward the wall is where you can see boards would need to be cut to fit.

Floors

Also if you are taking out carpet to put in hardwood you may and you have a heating/cooling vent you might have to cut down the register if you are putting in wood grated with your flooring, I do not have pictures, but Jon cut our down easily with a sawsall, be careful when cutting the metal for sharp spots!

The last few board of the flooring have to be face nailed again, at least our were since the nail gun would not fit close to the walls.

After all the flooring was in we rented a sander from Menards, and they had 3-2-1 sanding pads for sale that fit the machine, 3 being coarse, 2 less coarse, and 1 the fine and final sand.  They did not think I would need the 3 but I brought it home anyway and I am glad I did because there were some spots that the wood was higher/lower and he 3 took care of this quickly, the 2 would have taken a long time.

Sander

Once it was all sanded and smooth, we wiped the wood down with lightly damp clean rags, just enough to catch all the dust but not soak into the wood.

Oak Flooring

We let it dry and then did 4 coats of an oil based polyurethane.  The poly we chose was the one we thought best matched the existing floors.

2013 May 700

I think we got it right:

Oak Flooring

Again the before and after:

Living RoomOak Hardwood Floors

Tools used for this Oak floor DIY  project:

  • Hammer
  • Small crowbar
  • Screwdriver
  • Sawsall
  • Rented Orbital Sander
  • Painting wand and pad
  • Wood floor Nailer
  • Putty Knife
  • Level
  • Saw

Cost for this DIY Project:

  • Oak flooring and 2 registers:  $814.74
  • Disposal fee for old carpet and pad:  $25.00
  • Nailgun: Free (borrowed from my Dad)
  • Nails for the nailer: $25.92
  • Tar Paper and Rosin Paper: $7.45
  • Wood putty : Free (again we had this on hand)
  • Sander rental and 3-2-1 pads: $43.39
  • Polyurethane and painting pad( we used the handle we already had): $83.05
  • Tools: Free (we had all of them on hand from other projects)
  • Labor: Free 🙂

This project totals : $999.55

Just under a G, bids on this were around $2500.!!  We saved over 1/2 by DIYing this floor and we LOVE it!!

It did take most of Memeorial weekend, but that included many interruptions from those that are now pitter pattering around on this beautiful floor.

So I think most could be this done in a weekend but each coat of poly needs about 3 hours between them, so if you did more than 4 coats it will add time to the job.

Shiny Happy Floors

I am going to get right to it…our new floor:

Oak Hardwood Floors

Now if you have been here all along you might also notice that something else changed…

Lets review shall we?

Here is the before of this space, after we moved out our furniture:

2013 May 418 copy

Previously we were using this as a living room

2011 June 1819 copy

But we traded out this:

2013 June 174 copy

For this:

2013 June 171 copy

And this:

2013 May 415

For this:

2013 June 170 copy

We did a living room dining room flip, I love that our new flooring goes throughout the whole space, the carpet always left us feeling like we needed furniture on one side or the other…don’t cross the line!!

This was a complete DIY project, it took us one long rainy plus weekend and it was about 300 square feet.  Cost and details are coming.

Plus we built a new Master Bedroom headboard for FREE!

Stay Tuned!

And if you see carpet be gentle, she took the break up hard, but she was good to us for almost 7 years, trustworthy,  and loyal, but she had secrets; hid too many things, we needed a smooth shiny new floor, one that wouldn’t hide spills…it was us, not her…you know.

We’ve Got Wood

Seriously …number one in speech writing is an attention getter right?!? Well I am applying that to blog writing and titles..today.

Yes we do , we have wood: white oak unfinished 3 1/2 by 3/4 inch various length hardwood flooring,  wanna see??

Ebay 929

We have it set behind the love seat in the living room so it can “acclimate”, so that when we put it down, nail it in, sand it and clear coat it, we don’t end up with any seams shrinking and gaping open.

Ebay 930

The salesman at Lumber Liquidators said it should sit for about a week to 10 days.

Ebay 931

Can’t wait to show some progress on this pile of wood.

New Wood Flooring Has Been Ordered

It has taken quite a bit orf researching and information gathering as most well thought out projects do, and I am happy to say that we have chosen and ordered hardwood floors for the upstairs living space as of 2 hours ago!!

Ok so here is a before picture:

2011 June 1819 copy

The carpet looks fine in the picture, but it does not look great up close, it is 6 years old and was very inexpensive carpet to begin with, and it no longer looks nice.

What you cannot see in this picture is that the carpet in the living room buts up to red oak hardwood flooring in the kitchen/dining room.  When we built this house the orignal plan was for hardwood throughout the main floor, but I asked to have carpet in this living room area.  We had just sold a house that was all hardwood flooring, which we loved, but is hard when you have littles, I wanted an area where I could plop them down with some toys that would be soft landing.

Now that everyone has graduated from toddler-hood, the carpet has done is job and is ready to retire.

Here is what we purchased:

red oak unfinished flooring

It is an unfinished red oak “select” meaning it has no knots or imperfections, which is what is already in the house size 3 1/4 X 3/4 inch.

We purchased the flooring from Lumber Liquidators, we looked at HOme depot, they did not have it available in unfinished, we also tried to buy from a local small town restoration business but after a week of waiting for a return call, and our tax return money just sitting there in the bank;), we decided on Lumber liquidators.

We have to wait 7-10 days for the flooring to get to our store, then we need to let is “rest” in our house for 7-10 days, 2 weeks being ideal.

Then we can install, sand and clear coat.

We are really excited and I will keep you in the loop for each step!  We are pretty seasoned DIY’er our last house we had to refinish the floors, but we have never actually installed them so this will be new for us.

Almost done..Corner Fireplace

What took the longest on this fireplace project was not the work, but the decision making. We cruised along through the framing and even the stone was an easy choice.  We freecycled the mantle our of a tree that had fallen  at the end of the street, we really llove the natural look of it, but are not sure if we want to leave it “raw, or add some color?

Hubby wanted to have a hearth, I think he is envisioning that cheery Christmas card photo in front of this beauty. This is where we hit a major stall. Since we added this hearth we cannot figure out what to put there, stone won’t work, we can’t find a tile, granite or marble that we like with the stone and wood, plus I don’t think we want to add any more types of material to this project.

We decided on the tile in the picture…it is a bit dark but we think it works best :


We really love the way it is turning out we jsut have to finish the hearth and do something with the matle…stay tuned!

Farmhouse Table….New Kids Desk

one thing I love about all the wonderful people blogging out there is that there is no shortage of amazing inspiration and the generosity of the same people sharing the how-to’s for said inspirations.  Once again I fell victim to a must create over at Anna White’s Site.  This narrow farmhouse table here, sent me into the garage once again to recreate the table.  I even had a place for it!!  Under the windows in the office, a perfect place for the kids to do homework and e near Jon and I when we are working in the office.

We made the legs out of reclaimed pallet wood, the top we bought the top and side boards.  I sanded the crap out of the top to make it look as much like a solid piece as possible.

I stained the top and put 3 clear coats over the stain.

I painted the legs white, then I distressed the paint with a hand sander.

I did a top coat of Trewax mahogany wood wax.


Markers, colored pencils, a small light, plain paper, lilacs and lillies out the window, bring your imagination to this table and put it on the paper kids:

I do have chairs for the table that are in teh process of being reinvented…I will add a post about them when they are home….but here are a few more shots of the table:

Growth Chart…Done!!

Let me just say that as often as I think…oh I can do that….often it takes a lot more work to  make something than a person would think.  I am proud to say that from start to finish RAiven and I completed this DIY growth chart by ourselves.  I posted about our start here and yes just the girls with our power tools, oil based stains, paint, brushes and girls abilities completed this project.

I had the board in the garage from another project,  I bought a vinyl tree decal from Target, but thought it was too heavy so I painted an outline round the vinyl, then we stained the whole board in our chosen green stain.  after the stain had set but not completely dried we peeled the stickers off.

Then we added the numbers and lattering….we distressed the stain and hand painting a bit and then did an all over clear coat.

To hand it I did the pop tab hangers, I saw this on pinterest and thought it was a great way to reuse and the price was perfect…free!

So now we have it hung on the wall and everyone measured!!

The black splotch is where I took out our last name..it does not really look like that.

I have updates coming on the fireplace and the garden plot.  Plus I am working on a narrow farmhouse table inspired by Anna White , so I will post pictures when I am done.

L Shape Garden Complete

It took longer than I hoped to post about our completed L-Shape garden, that I originally posted about here , we completed the garden and have it planted, it was actually a fairly quick project.  Here is the before picture again:

We decided to move all of the garden but not the little square strawberry patch that you see on the right side of the picture.  I did not want to risk losing a strawberry crop this year, so we will move them in the fall.

Here is what is in the space that WAS the garden:

I just love this new space, I can see the kids in the backyard, on the trampoline, and in the sand box. The limestone rocks we retrieved from an empty excavated area in our development.  The tree was the largest investment..about $147, we transplanted some purple coneflowers from another flower bed, I had no idea how much these flowers multiplied.  The lilacs on each end we purchased for $19.99 a piece they will be
white.  I can’t wait until next spring to cut some blooms and bring them in the house….mmmm lilacs smell the best!

Here is the new L-Shpae garden that we originally posted about here:

We have romaine lettuce, onions (red and white), cucumbers, peas, and sweet potatoes in a bucket. WE also moved the compost bin to the corner of the garden, we had it on the side of the house but it was not getting enough sun to “cook” properly.  Plus now we can just spread the ready compost into the garden.

So glad we decided not to move the strawberries, I can’t wait untill all these ripen!!