We’ve Got Wood

Seriously …number one in speech writing is an attention getter right?!? Well I am applying that to blog writing and titles..today.

Yes we do , we have wood: white oak unfinished 3 1/2 by 3/4 inch various length hardwood flooring,  wanna see??

Ebay 929

We have it set behind the love seat in the living room so it can “acclimate”, so that when we put it down, nail it in, sand it and clear coat it, we don’t end up with any seams shrinking and gaping open.

Ebay 930

The salesman at Lumber Liquidators said it should sit for about a week to 10 days.

Ebay 931

Can’t wait to show some progress on this pile of wood.

New Wood Flooring Has Been Ordered

It has taken quite a bit orf researching and information gathering as most well thought out projects do, and I am happy to say that we have chosen and ordered hardwood floors for the upstairs living space as of 2 hours ago!!

Ok so here is a before picture:

2011 June 1819 copy

The carpet looks fine in the picture, but it does not look great up close, it is 6 years old and was very inexpensive carpet to begin with, and it no longer looks nice.

What you cannot see in this picture is that the carpet in the living room buts up to red oak hardwood flooring in the kitchen/dining room.  When we built this house the orignal plan was for hardwood throughout the main floor, but I asked to have carpet in this living room area.  We had just sold a house that was all hardwood flooring, which we loved, but is hard when you have littles, I wanted an area where I could plop them down with some toys that would be soft landing.

Now that everyone has graduated from toddler-hood, the carpet has done is job and is ready to retire.

Here is what we purchased:

red oak unfinished flooring

It is an unfinished red oak “select” meaning it has no knots or imperfections, which is what is already in the house size 3 1/4 X 3/4 inch.

We purchased the flooring from Lumber Liquidators, we looked at HOme depot, they did not have it available in unfinished, we also tried to buy from a local small town restoration business but after a week of waiting for a return call, and our tax return money just sitting there in the bank;), we decided on Lumber liquidators.

We have to wait 7-10 days for the flooring to get to our store, then we need to let is “rest” in our house for 7-10 days, 2 weeks being ideal.

Then we can install, sand and clear coat.

We are really excited and I will keep you in the loop for each step!  We are pretty seasoned DIY’er our last house we had to refinish the floors, but we have never actually installed them so this will be new for us.

“Room” for Improvement.

Previously I shared Avalon’s room, you can see it here.

It seems no small task to get their rooms tidy enough to take photos to share, but I am sharing Santanna’s room because it needs to be redone read, paint, and decor.

By far it is the hardest to get her to keep her room organized, it seems like every time we “deep clean” it and I give her bins and tips, and take more out, it just ends up haphazard all over again.  Cool with me if she can find things…but thats not the case.

Anway…here is her room AS IS:

Walking in we have a coat hook, I think this might have to go, it feels like a catchall and clutters the entrance?

Ebay 555

Looking in from the hallway, can you see that we have started to patch holes in preparation for fresh paint, probably evident in every picture;)…oh and there’s Farley..he loves Santanna!

Curtains need to go/change, I painted her name in one color than was going to change it to match the Circo Love and Nature bedding, which will probably stay, but never finished…add that to the l ist.

Ebay 562 copy

Bed side table….less stuff, or maybe one on each side, for books and alarm clock, lamp?

Ebay 556 copy

These shelves used to be over a bookshelf, and now just look out-of-place, I think they need to move to a more thoughtful/purposeful place.

Ebay 557 copy

Here is what houses almost all her books and toys, it was 2 bookshelves ( that we built) and repurposed into a cubby system. Notice those green woven bins from Target again that I used in the pantry …man I might have bought them all from our store.

Ebay 558

I would love to see a cushion on part of this??  She likes to set up her toys and play n it, so maybe just 1/2 for a cozy reading spot.

Ebay 559 copy

View of her bed sitting on the cubby system with my back to the window, you can see the heavy blanket peeking out from under her bedding, it gets COLD here, layers are cozy!! She needs a headboard or bed frame of some sort.

Ebay 561 copy

Recap of to do list for this room

  • Paint
  • Move coat hook
  • Paint her letters or remove
  • Bedside table…add another/declutter
  • purposeful shelving and wall decor
  • Headboard/footboard, bed frame
  • Cushion on cubby system

Putting Modesty Aside.

This may not be going where you think:)
I want to take just a moment and share some parental pride in this post regarding our son, Solomon.
I know that as parents we are all ridiculously proud of all our children, and revel in their accomplishments big and small. This is not meant to be boastful, just a momma sharing her pride.
Solomon participates in the highly gifted education opportunities that are provided through our neighborhood public school, he tests into these with an aloof ease that I wish I had more of as a student. He is also extremely fortunate to have a fantastic, well articulated, very organized and enthusiastic teacher, who expects from her gifted students what they are capable of.
That being said, she encouraged her students to participate in Letters about Literature

What LAL Does:

LAL is a reading promotion program of The Center for the Book in the Library of Congress, presented in cooperation with participating affiliate state centers for the book across the country. LAL invites readers in grades 4 through 10 to enter our annual writing competition.

To enter, readers write a personal letter to an author, living or dead, from any genre–fiction, nonfiction, or poetry, contemporary or classic–explaining how that author’s work changed the student’s way of thinking about the world or themselves.

There are three competition levels:

  1. Level I for children in grades 4 through 6;
  2. Level II for grades 7 – 8,
  3. Level III, grades 9 – 10.

Solomon chose the book The Evolution of Calpurnia Virginia Tate, which I reviewed here, so his letter was written to Ms. Jacqueline Kelley, we edited it and he carried it off to school in his backpack.  As his mom , I of course, was proud and thought he had done a great job.

Last night my husband got an email from Solomon’s teacher that his letter has been advanced to State Level for judging at Level 1, in Minnesota there were 1,265 entires, so this is quite an honor.

The state level results will be back the first week of April, so keep your fingers crossed for him, and I will update when we find out.

Finale to Fab Five February and a few tips to listing on Facebook for sale groups.

All right last day and I will have you know we came in strong at the end, this is my style, mostly, even in races, I always save a little zoom for the last tenth of a mile and spring it out.
Yesterday I posted these beauties:

raiven 025 raiven 020

AND as of today we no longer own a lovely geometric print mission style futon, and I have people lined up to look at the bike. Now I know these are only 2 things, bringing the total to what 28….so Fab “five” February is more like Fab “just one a day” February, but as of right now we have sold 4 things and made put $154 back into our funds. If when the bike sells we will be over $600!!!!

Remember my goal was to clean out and sell 5 things per day for this month, then turn around and sell them on a local for sale by face book page.

Ok, so here are some tips I learned in this process from my 28 day experience:

1. Deciding to rid of items that have many parts, like kids toys, requires quite a bit of pre-organization (read time)

2. Make sure you have read and understand the rules of the group/board you are posting on.

3. Take a good clear picture of your item…I know this seems like a given, but some of the picture I saw were indistinguishable, people will be more interested in your item if you show some thought in presentation…right?!

4. Setting a goal is great, but be flexible, I came very short on my goal of 5 per day, our life just did not afford me enough time to get through everything.

5. List your item, and have measurements especially if it is a household item, and then be considerate, written messages can be misconstrued, add pleases and thank yous, and show general manners, these can go a long way in a transaction way before face to face interaction.

6. Set up a safe and flexible place to meet up, the mall, or a parking lot of a busy store like a Trader Joes, somewhere that you feel you could get out of easily if needed or there would be a good number of people around.

7. Clean your item up and if it needs batteries put them in, people are excited to get your item don’t disappoint them.

8.  BE ON TIME for your meeting. Let the buyer look it over, if you have represented your item accurately then you should be good to go, but know that they still have a choice to take it or leave it, this can be frustrating especially when everyone’s time is valuable.

9. When buying am item, bring the proper amount of cash, do not expect the seller to make change, or to take a check.

10. Thank your buyer/seller.

What are some tips or lessons you have learned in selling via facebook?

Overall, my experience has been positive with this experiment, I think I will still list some items as they come up on the facebook page.  I also bought a few items *shoes* for me!  I mean heck if I keep up one a day that’s 365 for the year …..wish me luck. 🙂


Fab Five February 2

Really should be my sixth post, but here I am still at it. I fall off when Jon works, it is enough keeping everyone happy, fed, somewhat clean and alive, I know that 5 items per day will be there when next I have time.
So in an attempt to catch up on 5 items to be sold per day I have a few more than 5. Bringing my total to 12, I have 2 of teh silver lamps, and there are 3 ikea magnetic cutlery holders. it may be harder than I think. to cut 140 items.
Here are todays items:

Ebay 081Ebay 082Ebay 084Ebay 086Ebay 089Ebay 090Ebay 091 Ebay 079Ebay 077

Pantry Organization

Quite possible the biggest road block we hit in the day is the dreaded “what’s for dinner” question. Not so much that the kids are asking, but neither Jon nor I have made any plans for this meal. As a family we all sit down to this meal 90% of the time, it is not generally so much what the food will be but the experience, that being said, no one enjoys waffles or cereal or an afterthought meal thrown together EVERY night. So what we need is a plan, an organized plan that can smoothly get us through this meal.
Problems that we need to address: ‘The Rut” we need to expand beyond the same old recipes that we have as tried and true stand bys, “The Time” unfortunately with a family of 6 we often do not have a large amount of time to prepare a meal with loads of steps, and hoards of dishes in the aftermath, and lastly “The stash” Jon and I are known offenders of grabbing a few things from the store on most days of the week, this has provided us with a nice supply of staples that we can usually creatively come up with something that will pacify everyone hunger for dinner, but can also lead to waste in excess and no again no firm plan.
Jon is gone for 2 full weeks this month, which gave me the push I needed to detour all 3 of the above problems. I planned out 5 days worth of meals, breakfast, lunch and dinner, including new recipes for dinner and shopped for all of the weeks needs, ( minus a few items that I will buy fresh the day of for a certain recipe). I brought the entire horde of groceries home and went to put them away in our pantry….

Solomon 378Solomon 377

Whoa!! Where in the world was I going to put all these groceries??? What in the world was I thinking, whose stuff is this in the hallway pantry?? The cart was obviously in front of the horse on this plan….

First Problem “the Stash” aka the pantry was no in desperate need of being solved….I set to work immediately.

It took me 3 days, and 2 trips to target since they ran out of the certain bin that I needed, but I successfully made our pantry into an organized, planned evening meal, stash closet in an OCD fashion that I did not even know I was capable of executing.

Our pantry is in a hallway making it very difficult to get a good straight on shot without crawling into the wall, but I think you get a good idea of what is going on with the Stash:

blog 024 blog 023 blog 017 blog 003

blog 005

Top Shelf: Food dehydrator, bread maker, small hand mixer and small crock pot, these are appliances that we do not use on a regular basis.

Lower 2 Shelves: Each of these has 3 green plastic bins, each bin has a designated food, from left to Right: First Shelf: Soups/broths, sauces/dressing, pastas, Second Shelf: baking mixes/cake mixes, canned fruits and veggies (we don’t buy many of these, most of the time we buy fresh), rice.

blog 004

Bottom Space: Kitchen aid mixer, large Crockpot and water bottle hoard. We use these appliances at least once a week, and the kids can grab and fill a water bottle anytime. With all our activities I need these to be easily accessible for them.

blog 027 copy

The dinner plan is in full effect with these clear bins, I can fit 6 across the top of my second from the top shelf. I have clips on the front of everyone. This is where I clip a dinner recipe and then I put all the dry ingredients needed for the recipe in the bin. Simple I just grab a bin and there are the ingredients and recipe I can either use fresh ingredients I have or pop to the store the day before or morning of and dinner is set.

Here is another bonus to this project, I realized that some of the food on our shelves had expired, that is waste that I am going to try and avoid with proper planning. There is an over flowering box of items ready for the spring garage sale, and a small grocery bag of items to donate.

blog 011 copy              I guess marshmallows do expire??!!  Who knew!

                                                                                                   blog 013

All for sale!!

blog 015         Donation!

Appliqued Turkey Shirt Tutorial

Happy to update from yesterday’s post that the Turkey shirt has made it through BOTH the washed and the dryer!!

Here is what I now have for Santanna:


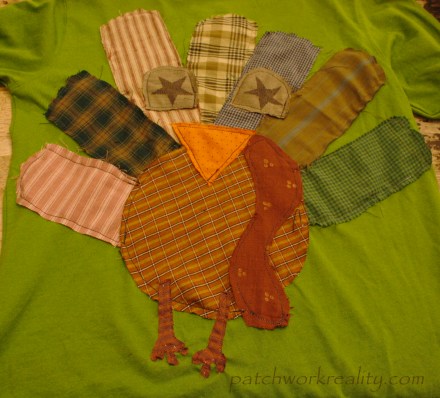
I am very happy with the way it turned out, I really like the raw edges on all of the appliqué, it gives it a bit of a feathery feel…if you make a shirt like this you can use a product called fray check on the edges and it should prevent this from happening, it may make the edges a little more stiff though so keep that in mind.

Please keep in mind that I am in no way experienced in the art OR science of sewing, especially with a machine, that being said here is how I made this shirt:

1. Grab a shirt, this black one was for sale in my ebay store, it was a new with tags Target cast off that set me allllll the way back 49 cents….so really if you are a novice like me, just take a shirt that you already have or thrift one, just in case…..

2. Gather fabric, I recommend getting material that is not very stretchy, it will make this much easier when sewing onto the T shirt that is stretchy itself, I am pretty sure the fabric I used was quilting fabrics that someone had donated. If you have old sheets, tablecloths etc, these would be great

3. Grab templates for a circle, and feathers, our local bread store gave the kids these “feathers” to color and return for a free cookie, and the circle is a trace around any round object that you have at home. I know some of my directions might not seem super concrete but I think that any artsy/craft project should be more of how you like it with guidelines than solid have- to’s..

4. Cut out all your templates, I free handed the eyes, the fabric I used dictated the eyes, you might want circles or layers, play around with what you have until you like them the I had a few different styles before I decided I has them right. For the beak I cut a triangle and for the snood (the bacon looking thing, yes I had to Google that) I cut a free hand bacon shape. I cut different size circles for the body which was dictated by the size of the shirt. So you have a circle (body), arrow shapes (feathers), triangle, (beak), and a bacon shape (snood).

5. Now lay out your feathers on your shirt, move them until you like how they lay, I did some at different lengths to give it a natural abstractness, then lay your circle over them and carefully pink the feathers to the circle but NOT to the shirt. Sew around the circle to set feathers in place, do not forget to backstitch. Continue these steps, continuing with the beak, eyes and snood (are you comfortable with this word yet?…not sure I am :))


6. Now you should essentially have a turkey patch or an appliqué, lay it out on your shirt, and pin it into place, after I did this I found there were some feathers that needed a little trimming here and there. Now here comes the trickiest part, sew around and up and down your circle and feathers to completely secure your turkey into place. Here is what I learned: the first shirt I made I actually just went whole hog and stitched the turkey parts onto the shirt like above, but I found it got very bulky and was hard to keep all the feathers straight. I did complete my first shirt by sewing right onto it so if you feel like this will work for you please do not let me discourage you. I just think it works better especially for the eyes and smaller parts to already have them sewn on prior to sewing on the shirt, otherwise it gets to be quite thick, and this starts in the T word….tension, I am not there yet. I appliquéd my turkey one feather at a time, and then laid my shirt back out to make sure all the parts were where I wanted them. I did end with some puckering some pieces moved a bit, but I really like the originality of the way it looks.


7. Decide if you want legs, or any other special details, a little fabric bow would be cute if you want a girly turkey. Snip any loose threads, turn the shirt inside out and wash in cold in and dry as you would any cotton T shirt. ENJOY your Turkey shirt!!!

The kids are really having fun with this, I just finished Solomon’s shirt tonight and he decided his needed legs, Raiven has decided that she would like hers appliquéd on with dark aqua thread. What better way for us to all hang out and be creative, then THEY get to wear it!!

You can see it is not perfect, but I can tell you that I have less than $6.00 invested in each shirt, if even that. I will post a picture of all of us at the Turkey trot.

Thanks for looking!

Gobble gobble:)


Repurposed Puzzle Snail Mail Letters

It seems to me like all we ever get in the mail are bills, magazines, political propaganda (which I think is over now, thank goodness), and an occasional party invite.

In my sometimes old fashioned nostalgia I encourage our kids to send letters to friends or family.  Santanna is especially fond of making letters and pictures for her little friends.  Who does not like to receive a fun piece of mail personally addressed to them in ink??

Our friends daughter,  who I wrote about previously  who is battling brain cancer, is getting an overwhelming amount of mail, letters and packages, guess who feels a little left out/angry about not getting any mail?  Little sister Elsa.  So, her mom grudgingly asked if we could help a girl out and send some snail mail Elsa’s way.  I think we all know how hard it can be to actually ask for help when you need it right?!

This got me thinking, we needed to blow up this girls snail mail box, how many pictures was Tanna willing to color?

Then it came to me, a puzzle letter:

Here is what we did:

  1.  Went to savers (you might have one of these not being used at home as well, we recycled this one, you might be able to repurpose your own),  bought this puzzle.

2.  We put the puzzle together upside down. This is harder then you think wihtout picture clues.

3. I helped Santanna write a letter and she drew whatever and decotared whatever she wanted in Sharpie and Crayola markers.

       4.     I included instructions with the first envelope.

       5. Then we took the puzzle about, mixed it all up and I got out my postal scale for mailing packages and we weighed each one equal to/less than an ounce.  For this puzzle it was about 5 pieces per envelope.

                                                                                                                                                                                                                                                                                                                                                                                 I am so excited for her friend to get this, she is going to be thrilled, plus it gives her something to look forward too.

I think I am also going to do this when the big kids are at camp for the summer.

Vertical Wall Stripes

We have been working on the revamp of Raiven’s room, my goal is to give her a room that fits now and will work for her until she leaves for college…..*sigh*.  I always have ideas in my head and the reality of the real space is usually different than what was in my head.

Raiven has this bedding set by Isaac Mizrahi for Target

I bought it about 4 years ago and she still loves it, so this is the color pallet for most of the room; bright pink, white, yellow, and maybe some red.

First we have to cover these dark blue/gray walls that we my choice for the walls when it was an office but it is too dark for a room on the lowest floor even with daylight windows.

It took 3! yes 3 coats of our almost white color paint, we even bought the paint with the primer in it.  Light versus dark, it is a hard battle, but like all good stories we won.  I also enlisted the help of some of my favorite employees:

Jon than taped all the lines for our vertical stripes, he has the patient for this…me not so much.

Here was the vision:  light silver metallic stripes that were not heavy maybe even just caught a glimmer in the sun.  Reality:  the paint dried super fast and was much darker than we thought.  Instantly I called the stripes to a halt and had a glass of wine (after the kids were in bed) and thought about the stripes.  It was not what I had pictured but we actually decided we really liked them.  What we did was paint them on only one wall instead of the whole room, which was the original thought with the more understated stripes we had planned.   Here is where we are:

In my best Violetn Femmes voice: ” Let me go onnnn like I glitter in the sun Let me go ooooonnnnn”

You can see some of the variations incolor in the stripes from our intial painting that I halted.  This paint has to go on fast and even, it dries almost instantly, I really like the way it looks now.  I think it looks more like real metal with some color variation.

Working list far Raiven’s room:

  • Picture collage above her bead
  • Repaint the vanity?  Not sure if I want to tackle that or leave it wood.
  • Find a chair for her vanity
  • some sort of bookshelf or shelving system  for books and nick nacks.
  • Her closet needs to be reworked, it is just builder grade 2 shelves with hanging, the space could be utilized so much better